Parallax Propeller Book - Seven Segment Display
In this Chapter we will discuss how to use Seven Segment Display to show digits:

as well as Letters:

Seven Segment Display
All the various versions of Seven Segment Display are usually wired as shown in the Figure 36-3 below.
Both common Anode (+) or common Cathode (-) versions exist for LED displays as well as LCD displays.
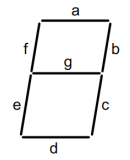
Segment Activation Table
| Displaying | Segments ON |
Segments OFF |
Binary Code |
Case | Note |
|---|---|---|---|---|---|
| 0 | a,b,c,d,e,f | g | 1111110 | 0 | |
| 1 | b,c | a,d,e,f,g | 0110000 | 1 | |
| 2 | a,b,d,e,g | c,f | 1101101 | 2 | |
| 3 | a,b,c,d,g | e,f | 1111001 | 3 | |
| 4 | b,c,f,g | a,d,e | 0110011 | 4 | |
| 5 | a,c,d,f,g | b,e | 1011011 | 5 | |
| 6 | a,c,d,e,f,g | b | 1011111 | 6 | |
| 7 | a,b,c | d,e,f,g | 1110000 | 7 | |
| 8 | a,b,c,d,e,f,g | 1111111 | 8 | ||
| 9 | a,b,c,d,f,g | e | 1111011 | 9 | |
| C | a,d,e,f | b,c,g | 1001110 | 10 | Cold |
| E | a,d,e,f,g | b,c | 1001111 | 11 | Empty |
| F | a,e,f,g | b,c,d | 1000111 | 12 | Full |
| H | b,c,e,f,g | a,d | 0110111 | 13 | Hot/High |
| L | d,e,f | a,b,c,g | 0001110 | 14 | Low |
| a,d,g | b,c,e,f | 1001001 | 15 | 3 bars | |
| a,b,c,d,e,f,g | 0000000 | 16 | OFF |
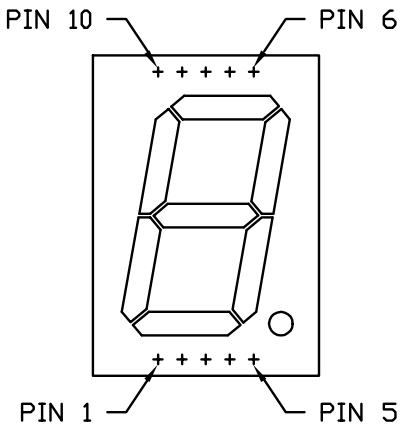
Port Assignment / Connection Table
| Pin | Segment | Port |
|---|---|---|
| 7 | a | P19 |
| 6 | b | P20 |
| 4 | c | P21 |
| 2 | d | P22 |
| 1 | e | P23 |
| 9 | f | P24 |
| 10 | g | P25 |
| 5 | Decimal Point | P26 |
| 3,8 | Common |
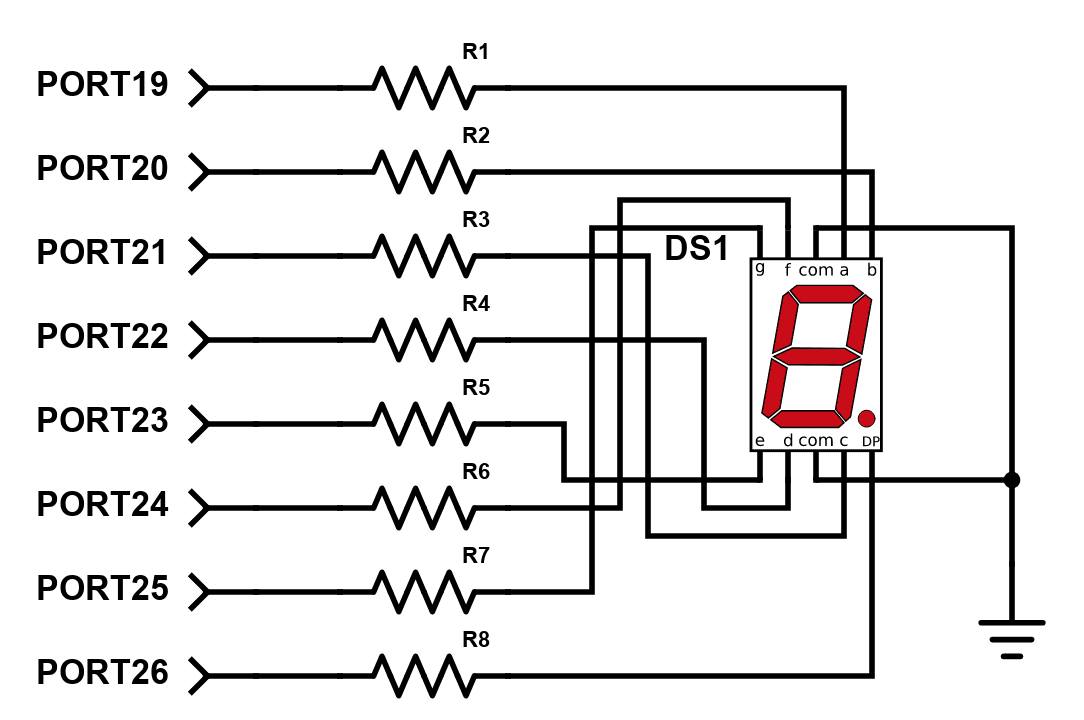
The following Methods are for Seven Segment Display with common Cathode, wired as shown in Figure 36-4 above. All resistors (R1 to R8) are same and of any value from 150 Ohm to 470 Ohm, depending on current draw of the Segment LEDs and the desired brightness of the displayed character.
Any individual I/O pin can source or sink about 40
mA
however, care should be taken to ensure that the entire chip does not exceed
1 W of power dissipation.
See the Propeller P8X32A Datasheet for more
information.
See the specifications in Datasheet for the Seven Segment Display that you plan to use, most are limited to 20 mA per segment, however we recommend that you select the resistors so initially the current per Port / Segment does not exceed 10 mA.
It is also important to note that some versions of Seven Segment Displays may have more than one LED connected in series per each individual Segment, thus the minimum forward Voltage may be significantly higher than what is normal for a single LED. Therefore, if the minimum forward Voltage is higher than 3.3 V the Segment many not light up.
That is why it is important to either get the specifications from Datasheet or test the Seven Segment Display and determine the minimum required Voltage for its operation.
The Common Cathode of the Seven Segment Display is permanently grounded, i.e. attached to (-). Most Displays have two Common Cathode Pins, and either or both can be used as they are internally connected together. (usually Pin 3 and 8)
Each segment lights up when the appropriate Port / Segment combination is provided with +3.3V DC.
The Method below lights up Segment “a” when Port P19 is HI.
'' 36-1_Segment-a-ON-P19.spin
Common Cathode (-)
PUB SegmentOn ' Public Method declaration
dira[19] := outa[19] := 1 ' Set P19 to output; Set P19 high (HI=ON)
repeat ' Endless loop prevents program from ending
Above Spin lights up segment “a” on the Seven Segment Display.
To test other segments change the Port number as per Port Assignment Table above.
The Spin below lights up each segment in sequence for one second and repeats forever.
'' 36-2_Segment-x-ON-Test.spin Common Cathode (-)
VAR
byte Segment 'Set up a number to identify a segment Port
PUB SegmentTest 'Name this object: SegmentTest
Segment := 19 'begin with 1st segment on port P19
dira[19..25] := %11111111 'all Segment Ports set as outputs
repeat
'create an endless loop
outa[Segment] := 1 'turn on Segment x at Segment
waitcnt(clkfreq + cnt) 'wait one seconds
outa[Segment] := 0 'turn same Segment off
Segment++ 'increase Segment number by one--next Segment
if Segment > 25 'ensures count doesn't go past last Segment Port
Segment := 19 'if count > 25 (last Segment g position)
'reset count to P19 (Segment a)
The Spin below lights up each digit or letter character in sequence for one second and repeats forever.
'' 36-3A_Segment-Display-Test.spin
Common Cathode (-)
CON
SegmentA = 19
'Set up a constant number to identify A segment Port
VAR
byte SegmentG 'Set up a number to identify G segment Port
byte A 'define CASE counter A as Byte (0-255) sized global variable
PUB Start
Ini
XStep
PUB Ini
SegmentG := SegmentA + 6 'Define Segment G Port
dira[SegmentA..SegmentG] := %11111111 'all Segment Ports set as outputs
outa[SegmentA..SegmentG] := %00000000 'display is Blank
waitcnt(clkfreq + cnt) ' wait - one second delay
A := 0 ' Set A to zero 0
PUB XStep
' Increments A by 1 and waits 1 second
repeat
' Infinite repeat loop
DisplayTest
' Go to DisplayTest code
' Return from PUB DisplayTest
waitcnt(clkfreq + cnt)
' wait - one second delay
A++
'increase A number by one--for next CASE
if A > 16
'ensures count doesn't go past last Segment Port
A := 0
'if count > 16 (last CASE)
'reset count to A
' Go to start of repeat loop
PUB DisplayTest 'Name this object: DisplayTest
case A 'Test A
0 :
outa[SegmentA..SegmentG] := %1111110
'A = 0 display 0 (ZERO)
1 :
outa[SegmentA..SegmentG] := %0110000 'A = 1 display 1
2 :
outa[SegmentA..SegmentG] := %1101101 'A = 2 display 2
3:
outa[SegmentA..SegmentG] := %1111001 'A = 3 display 3
4:
outa[SegmentA..SegmentG] := %0110011 'A = 4 display 4
5:
outa[SegmentA..SegmentG] := %1011011 'A = 5 display 5
6:
outa[SegmentA..SegmentG] := %1011111 'A = 6 display 6
7:
outa[SegmentA..SegmentG] := %1110000 'A = 7 display 7
8:
outa[SegmentA..SegmentG] := %1111111 'A = 8 display 8
9:
outa[SegmentA..SegmentG] := %1111011 'A = 9 display 9
10:
outa[SegmentA..SegmentG] := %1001110 'A = 10 display C = Cold
11:
outa[SegmentA..SegmentG] := %1001111 'A = 11 display E = Empty
12:
outa[SegmentA..SegmentG] := %1000111 'A = 12 display F = Full
13:
outa[SegmentA..SegmentG] := %0110111 'A = 13 display H = Hot / High
14:
outa[SegmentA..SegmentG] := %0001110 'A = 14 display L
= Low
15:
outa[SegmentA..SegmentG] := %0000000 'A = 15 display blank
other :
outa[SegmentA..SegmentG] := %1001001 'A = other than 0 to 15 display 3 bars
' Return to Method that called this
![]()
Currently this page is still under development, so please check back periodically for new links to pages as we add them to this list.
Links to related Webpages
Click the link in the list below to navigate to a detailed webpage about the listed subject.
- PREVIOUS: Parallax Propeller Book - Chapter 35 (Hall Sensor)
- NEXT: Parallax Propeller Book - Chapter 37 (TBA)